
Build a Cabinet Door
Listed below are the minimum materials needed to create a single professional looking shaker-style cabinet door!
I generally make cabinet doors 1 of 2 ways:
(a) Without screws, using joints+glue (great if you have more time and want more of an artistic approach to the joins and no seams - glue holds just as strong).
(b) With screws and glue (great when you have less time, but you will have to use wood filler on the ends).
This tutorial focuses on doors built with (a) joints and glue.
| Materials Required | Minimum Tools Required | Time + Cost |
|---|---|---|
|
(A) Wood for panels Choose your preferred panel width - I personally like my cabinet doors to have 2.5 in. wide panels. Make sure to get 8 ft. of wood for one door and that the wood is 3/4 inches thick. Aim for: 2.5 in. wide x 3/4 in. thick x 96 in. long + If you're staining the wood, I recommend Maple, Walnut, Mahogany, Cherry, Oak, Birch, or other hardwoods. Stick to hardwoods because they are more resistent to punctures, damages, and temperature changes. + If you're priming and painting the cabinet a color (white included), I recommend birch or maple because they hold paint well overtime, plus you won't see the grain show through so the fancier hardwoods don't necessarily matter. (B) Wood Glue ($3) (C) Power Drill ($99) (D) Pocket Hole Jig ($14) (E) Two Clamps (F) One Sander (G) Sanding Paper: One sheet of 80 grit, one sheet of 120 grit, and one sheet of 220 grit. |
- Sander |
This project can be completed in one day. I recommend planning the biggest time allocation for the wood cutting and prep process. Total minimum cost to begin Without needing to purchase a table saw: Under $100 HOWEVER, if you buy the table saw, you will be able to continue to complete an array of projects, as woodworking projects generally involve a table saw. |
STEP 1. Measure and Template the Door.

1st Template Step(see the Getting Started Cabinet Door Kit for links to necessary tools to complete this project).
Draw out the template for the cabinet door. You will be cutting 5 pieces:
2 long wood pieces (I will refer to these as ‘side’ panels)
2 short wood pieces (I will refer to these as ‘Top’ and ‘Bottom’ Panels
1 inner door panel
2nd Template StepMeasure the cabinet you are creating the door for. Start with the Width and Height.
The side panels measurement:
Take the height of the cabinet and subtract 1/4 inch (so that the door doesn’t brush the counter top).
The top/bottom panel measurement:
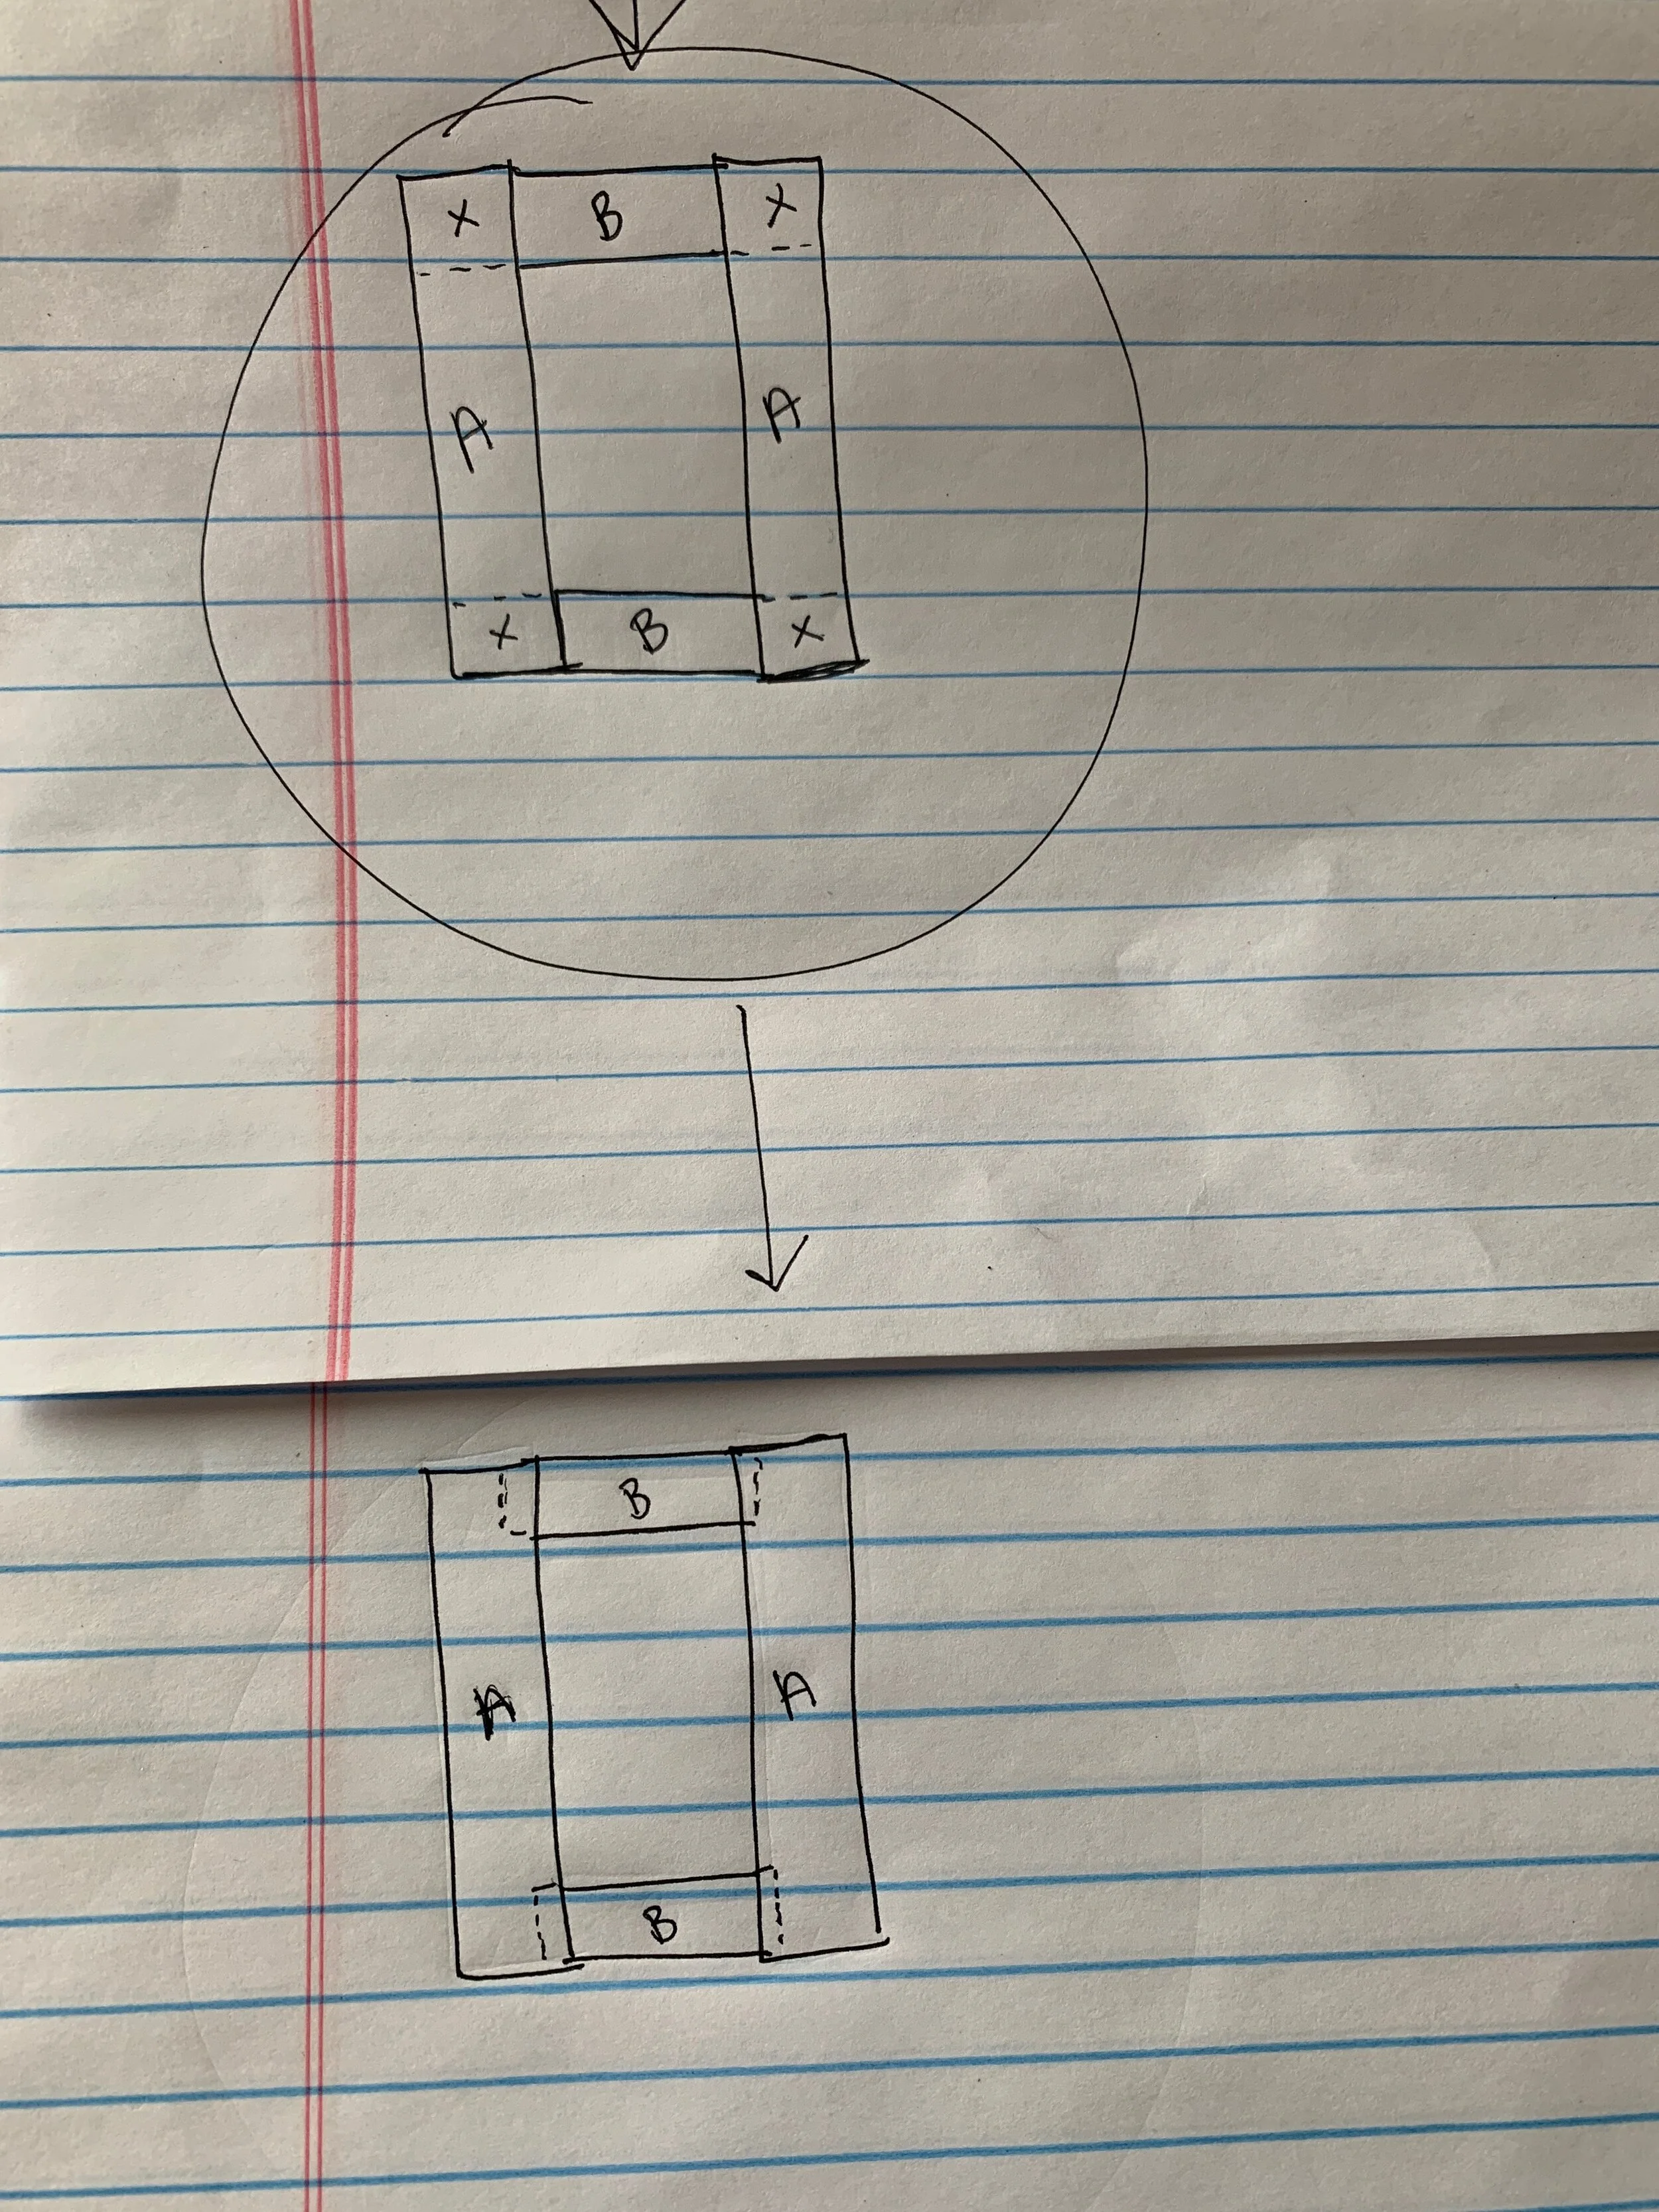
You will need to subtract the width of the side panels from the top and bottom panels (see images for reference). THEN YOU WILL NEED TO ADD 3/8 INCH TO EACH END OF THE TOP AND BOTTOM SHORT PANELS.
(See image for reference)
This additional 3/8 inch added to each end of the top and bottom pieces will be the tongue joint that connects to the groove on the side panels. It will be hidden, but it is how the wood panels connect.
The inner panel measurement:
Calculate LENGTH: Take the length of the side panel (Side “A” in the picture) and subtract the width of the upper AND bottom panel… then add 3/4 inch for the panel to fit into the grooves in the side panels.
Calculate WIDTH: Take the width of the top/bottom panels, including the 6/8 inch. The additional 6/8 inch will allow the panel to fit into the grooves on the top and bottom panels.

Final Template and MeasurementsEX: If you are using panels that are 2.5 inches wide
Total door width is 18 inches wide by 30 3/4 inches long.
Side panel measurements:
2.5 inches wide x 30 3/4 inches long.
Top/Bottom Panel measurements:
18 - 2.5 - 2.5 = 13 inches + 3/8in + 3/8in = 13 3/4 inches.
Therefore, 2.5 inches wide x 13 3/4 inches long.
Inner Panel measurement:
Length measurement: 30 3/4 in Side panel - 2.5 width of upper panel - 2.5 width of lower panel = 25 3/4 + 3/8 inch for groove on one side + 3/8 inch for groove on other side = 26 1/2 inches.
Width measurement: Same as top and bottom panels = 13 3/4 inches.
Therefore, 13 3/4 inches by 26 1/2 inches
STEP 2. Cut the Wood and Inner Panel.
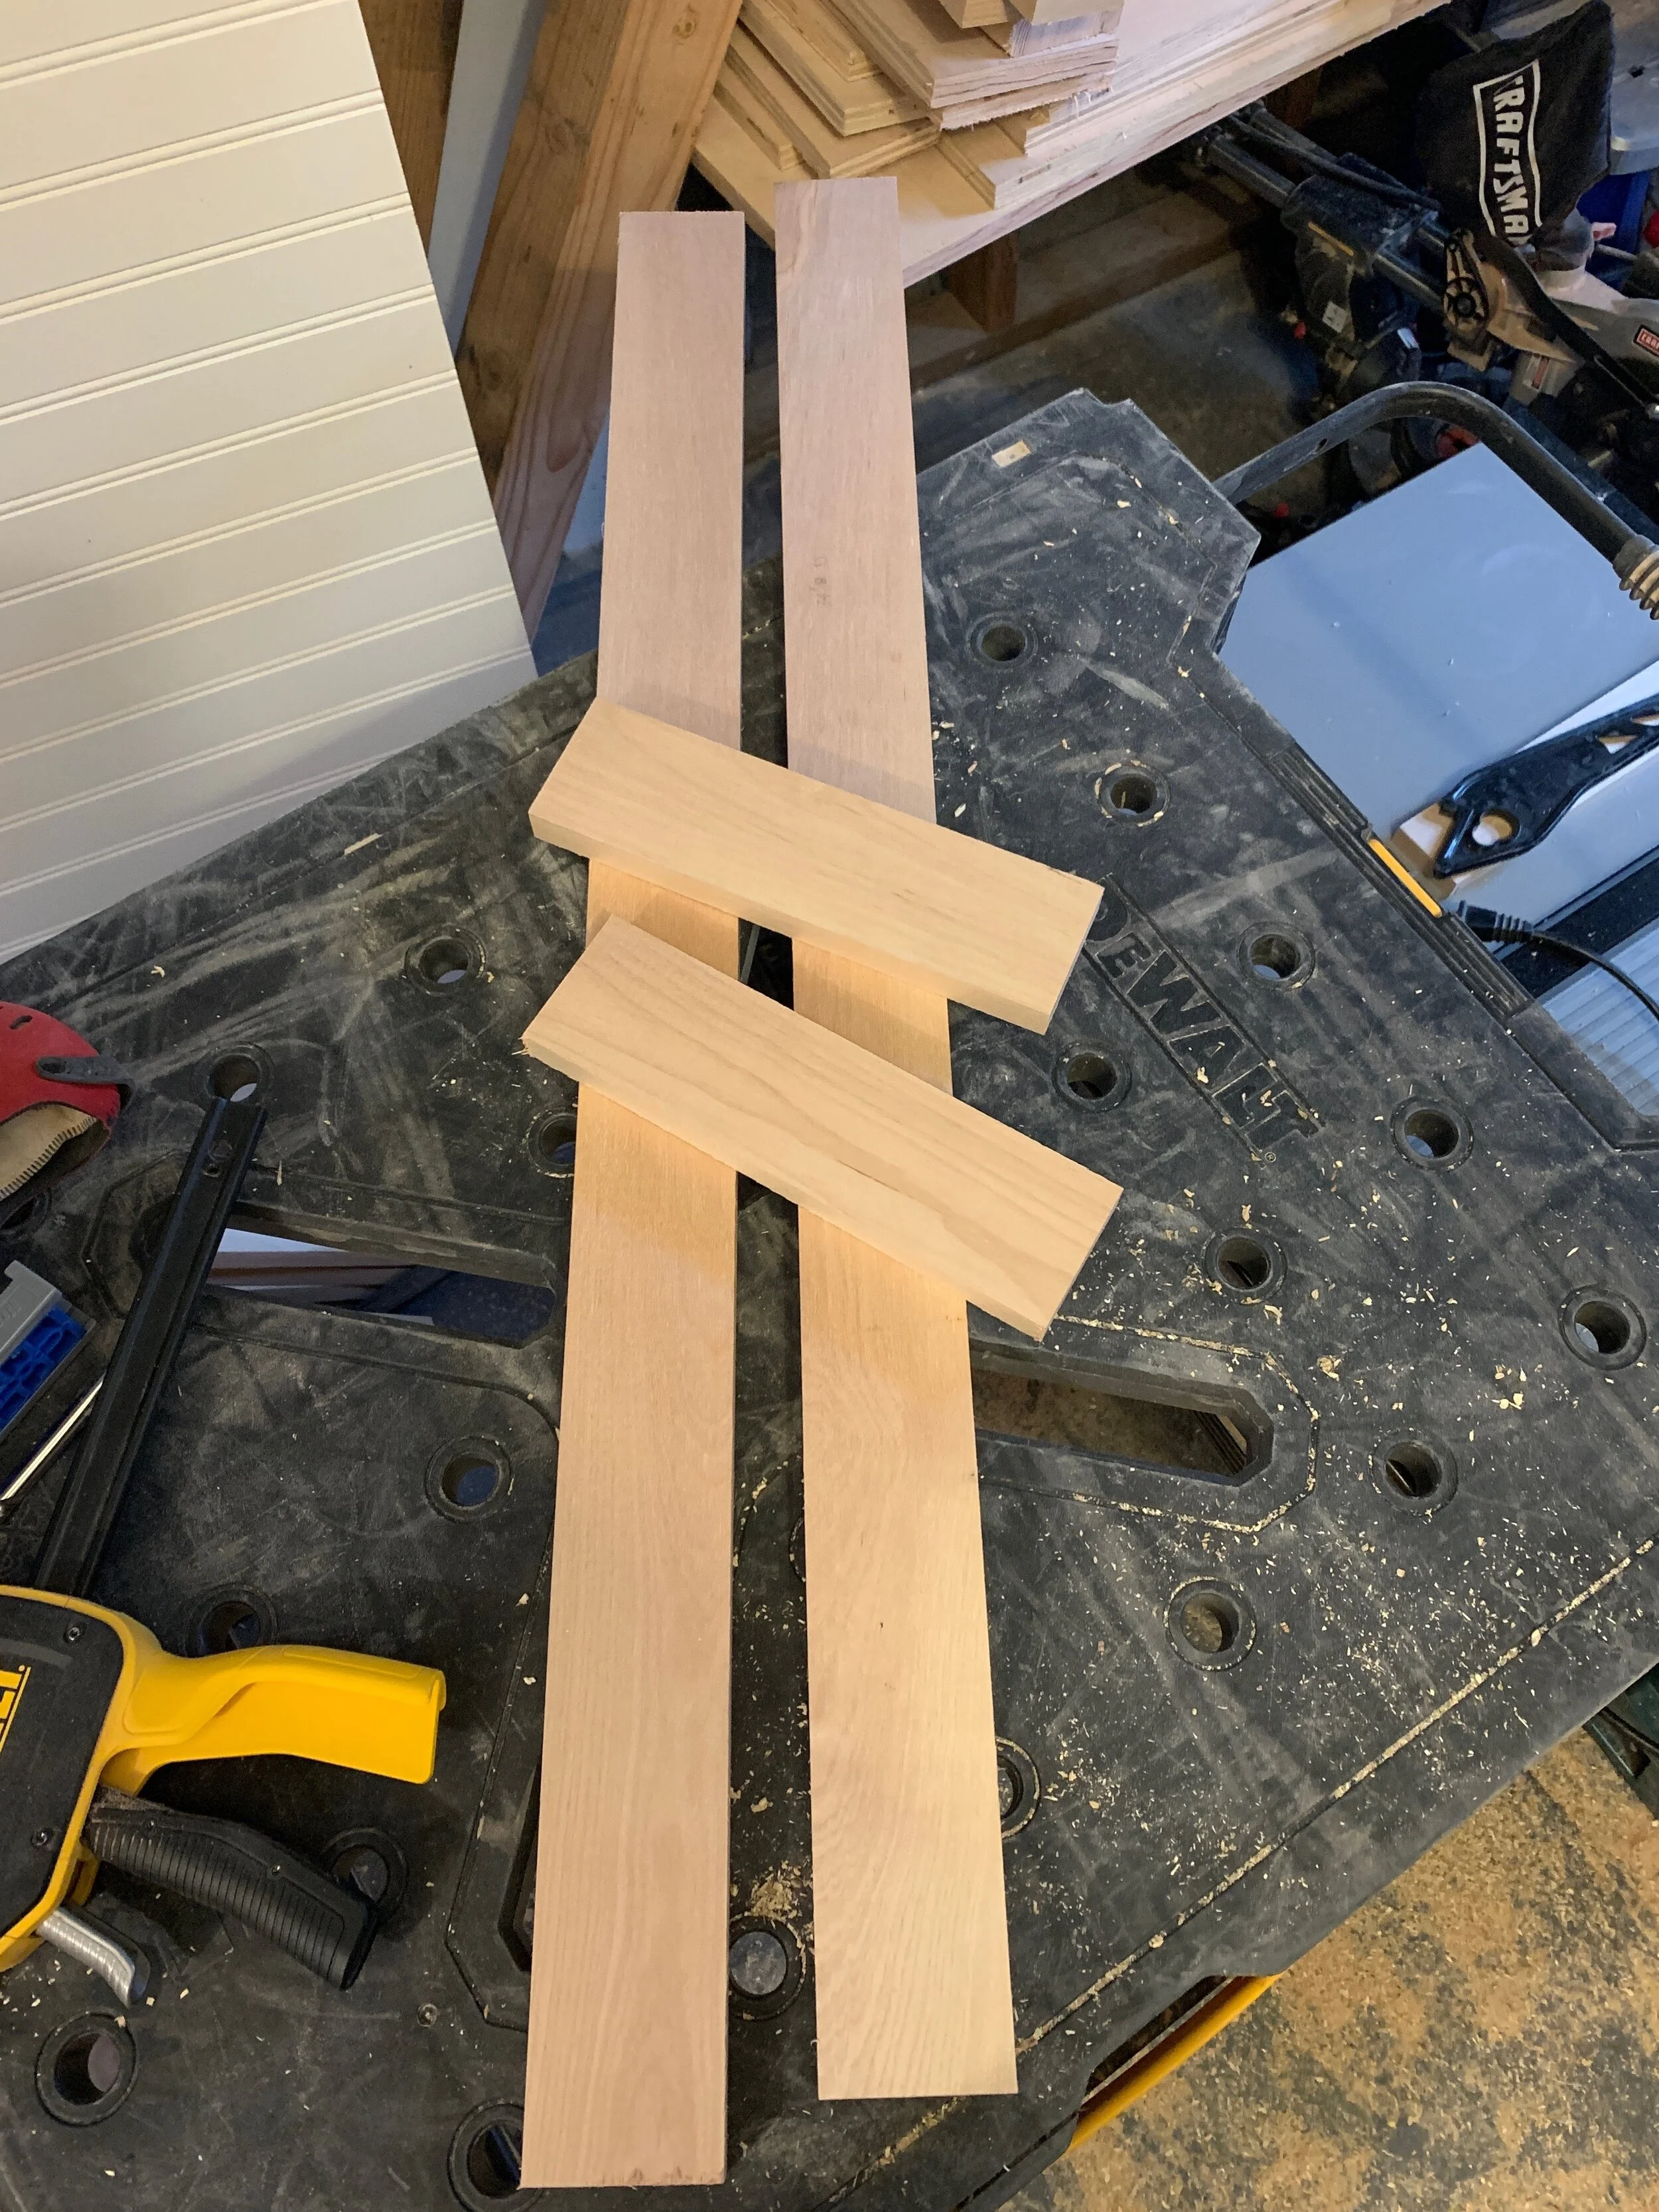
Make the marks on the wood as you go - especially if you are using one long piece of wood. I often see people forgetting to account for the blade width when measuring and they simply keep going down the wood and cutting on the pre-marked measurements. This isn’t always correct!
More often than not, this will leave you with uneven wood lengths.
I recommend using painters tape when cutting the inner panel wood as well - it can splinter easily.
STEP 3. Cut the Grooves

Using the table saw, adjust the height of the saw to 3/8 inch and then cut only one side on each piece of wood. I set the guide bar on my table saw at 1/4 in away from the blade itself. This allows me to cut at least 1/4 inch on the inside of the wood, which is where we want the groove to be.
Generally, table saw blades are 1/4 in thick so one pass through might be enough, but make sure to try to fit the panel inside the groove to double check that the inner panel will fit. If it does not quite fit, you may need to pass the wood through the table saw again in order to widen the groove for the inner panel.
STEP 4. Cut the Tongues

You are going to make 8 additional cuts; 2 to each end of the top and bottom panels.
This will create the “tongue” that will fit into the groove at the corners of the door.
Adjust the table saw to be 1/4 inch high.
Slide the ends of the top and bottom panels over the saw. You will make 1 cut, flip the wood over and make the second cut. Then repeat for the other end of the panel.
Cut the ends of the top and bottom panels to make “tongues” to stick into the side panels that will create the door corners.
STEP 5. Pre fit the door together
Clamp the wood and panel together and make sure they fit snug - Don’t skip this step!
I always like to double measure to make sure I don’t need to make any final cuts or edits.
STEP 6. Glue the Door Together
Once you have the sizing all correct, glue the door together and check for the right angles at the corner as you go!
Clamp the ends and use the side of the clamp as a brace to prevent the wood from warping under pressure!


STEP 7. Sanding
THIS IS THE TIME TO ADD ANY WOOD FILLER IF YOU FIND HOLES/CRACKS!
After the glue has dried, remove the board from the clamps and prepare to start sanding.
Always start with the lowest grit for sanding, and don’t skip a grit level! It can cause the wood to chip.
I recommend starting with 80 grit to scrub away any excess glue or impurities and using an orbital sander. This is a key part in the process - double check for any impurities!
Move up to 120 grit to prep for priming (if you are painting the door).
STEP 8. Priming the Door or Staining
*If you are staining the door only, then you will continue to finely sand the door through 220 grit sandpaper before conditioning and staining.
If you are painting the door (not staining), then start applying the primer.
After the primer dries, you will continue to sand the door with 120 grit.

Step 9. Paint + Sand + Final Paint
By now, you have successfully:
Sanded with 80 and/or 120 grit sand paper
Primed the entire door
sanded with 120 sandpaper
Now you will add the first layer of paint, then wait 24 hours
Then you will continue to sand with 220 grit sandpaper before adding the final layer of paint!
Why sanding is important: Sanding removes the impurities that will be visible when painting the cabinet door. Plus, it allows the primer to soak into the wood better and therefore retain the paint better!
You have now successfully built a Shaker style cabinet door!
Oh you fancy?!
If you enjoy building cabinet doors, next steps to streamline processes or add more character would be:
Using a router table for additional groove/panel design
Add trim detail to the inside of the panel board
Experiment with alternative designs